Keep them doggies coding… Sorry, inside joke. When I was working with a team developing one of the first direct-to-disk audio editing systems back in the late 80’s, all my sample audio came from the same CD. The sound track for “The Blues Brothers“. I actually tried to mix up the tracks, but after several days focussed on one specific feature for a post production editing tool, Rick Oliver (one of the smartest, most easy going programmers you could ever meet) complained about my near constant use of the same 15 seconds of the Raw Hide Theme.
After that, threatening to play it again was my ‘virtual whip’ to try to nudge him to do something. Anyway…
While we are waiting for hardware, we can frame in a little software or, more specifically, some ‘firmware’ for our selected evaluation board. We used some little snippets when we first checked compatibility with the free GNU toolchain and Eclipse IDE. And even streamed a little ILDA image data when we checked out our 8 channel DAC. But it is time to get a bit more serious.
The first big question is C++ or C. Among peers, it is no secret that I love C++. Particularly since the RAII (Resource Acquisition is Initialization) programming paradigm has been increasingly embraced, both by libraries and extensions to the language itself. And, without question, all our host software for Windows, OS X, iOS, and Android will be written in C++.
But we’ll be using a lot of libraries and driver files from ST.com, particularly parts of their HAL Peripheral Library and ST-Cube MCU Samples. These are all written in C with a semi-modular architecture. As much as I’d love to port and rewrite all that into a clean, RAII style, C++ class library, the benefits don’t really warrant the time investment for this part of the project. You can mix and match C and C++ in the same project, but there are some quirks and gotchas because of differences in the run-time libraries and things like “name mangling”, so C it is.
Back when we selected the ARM platform I gave you this link for development tools. This combination makes getting started with firmware pretty easy. In Eclipse, select File / New / Project from the menu and this dialog will appear:
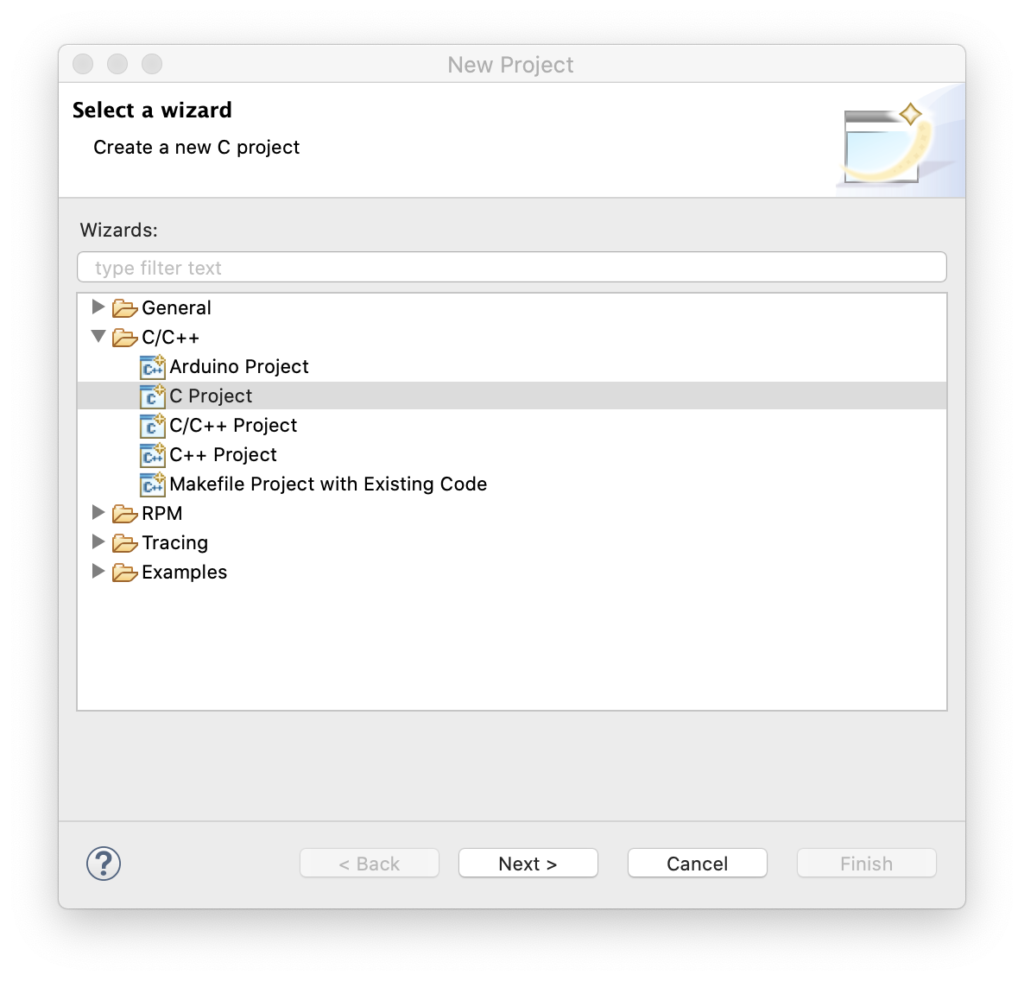
Pick “C Project” then hit next:
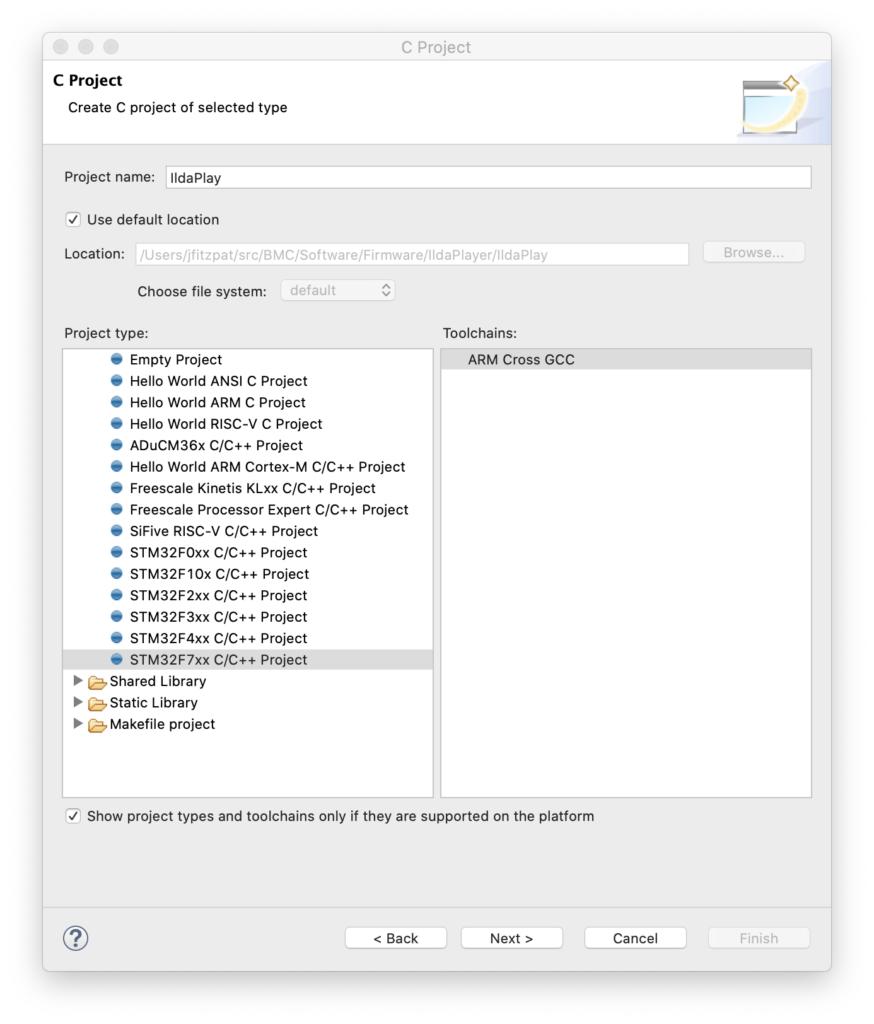
Pick a project name and select the template for STM32F7xx (our MCU family) and hit next again:
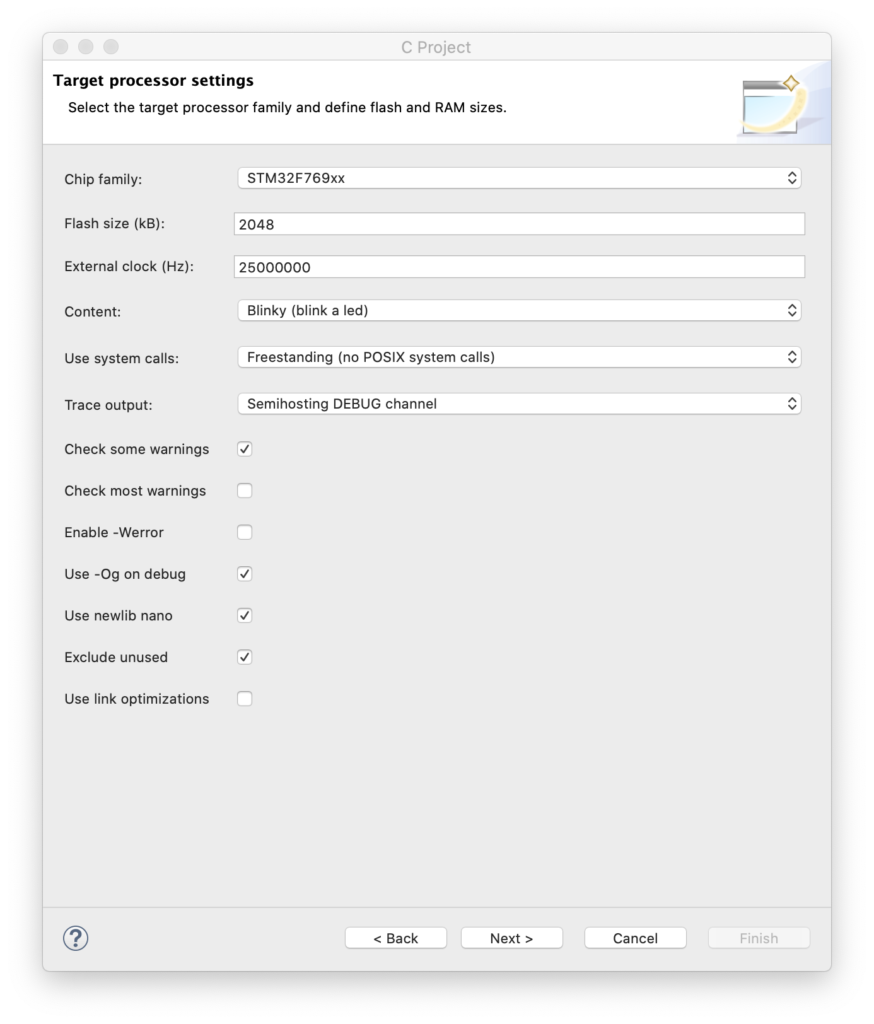
This dialog is critical. We need to enter the correct Chip Family (STM32F769xx), the proper flash memory size (2 meg), and, super importantly, the frequency of the external clock on our board (25 MHz). This wizard automatically creates the initialization code to get all the MCU clocking setup correctly. Having done this from scratch with this ARM family a few times myself, let me assure you this is a real time saver. Anyway, you can just hit next for all the subsequent screens until you get to the last one:
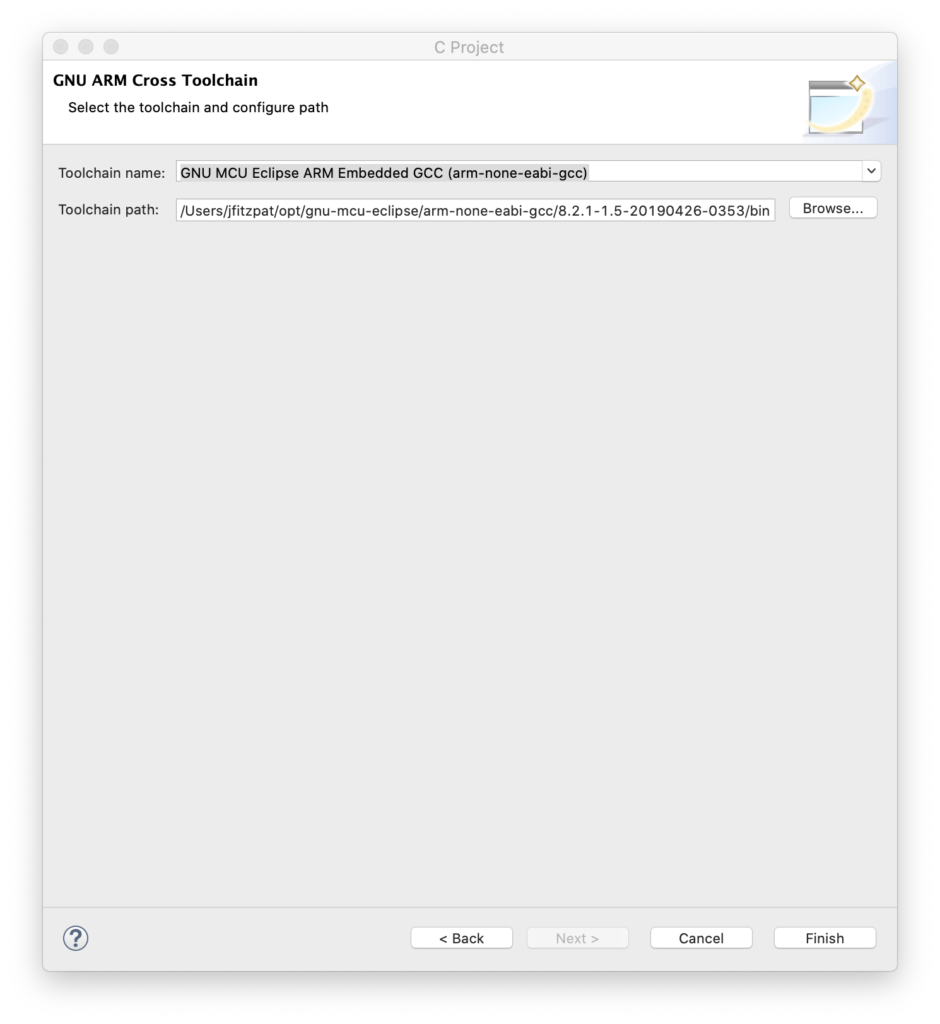
Make sure that this is pointing to your copy of the GCC ARM compiler. At this point you should have a project you can build (Project / Build All). But you’ll also want to run it on the board. To do this you will need to install OpenOCD. That was covered as one of the steps in the link above, but as optional.
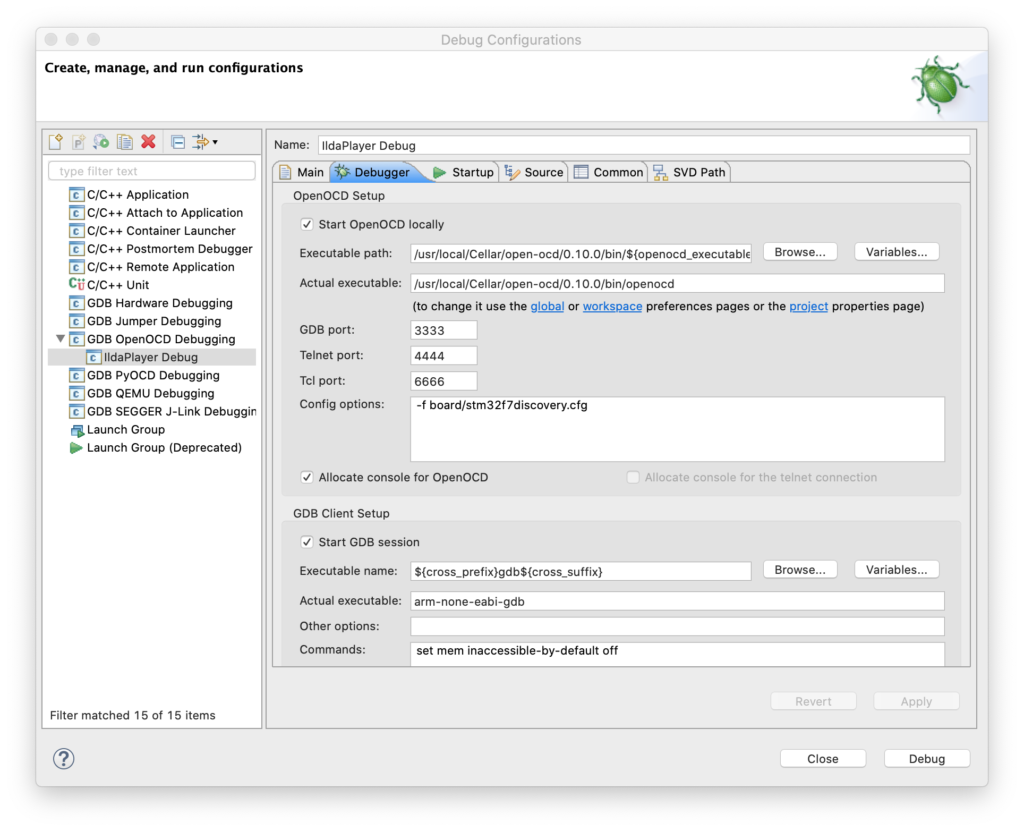
Once OpenOCD is installed you can go to Eclipse, select Run / Debug Configurations from the menu, right click on “GDB OpenOCD Debugging”, and create a new debug configuration.
The key is then the second tab (Debugger). You need to point to the OCD executable with “Executable path” and fill in “Config options” like this:
At this point you should be able to press the “Debug” button and the code will be compiled and loaded onto your card via the USB ST-Link connection. You can single step through the code, or let it run. It will send debug messages, but the LED won’t blink (we have to correct some place holder code for that).
Instead of walking you step by step through correcting a port/pin assignment, let’s just jump ahead a bit. The generated project contains a file called Timer.c and another called BlinkLed.c. I went ahead and replaced Timer.c with a new file called SysTick.c. This is our first ‘module’.
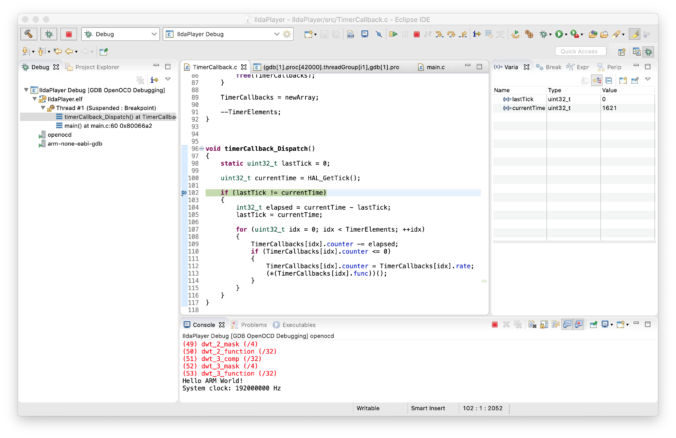
The next module is called TimerCallback.c. This is a simple timer/callback mechanism. Other modules can register a function to be called every x milliseconds. This is our placeholder for an operating system. We might switch to something more sophisticated later, but for now, this will do.
BlinkLed.c, along with a bunch of code in the original main.c are in a third module called… Led.c. This simplifies our main function quite a bit:
int
main(int argc, char* argv[])
{
  // Send a greeting to the trace device (skipped on Release).
  trace_puts("Hello ARM World!");

  // At this stage the system clock should have already been configured
  // at high speed.
  trace_printf("System clock: %u Hz\n", SystemCoreClock);

  // Initialize all the modules in their dependent order
  sysTick_Init();
  timerCallback_Init();
  led_Init();

  // Infinite loop
  while (1)
  {
	  timerCallback_Dispatch();
  }
  // Infinite loop, never return.
}
The Led.c initializes the LED I/O line when we call led_Init() and toggles the LED on and off every 500 mS when its timer callback function is invoked.
Yeah, it’s just a blinking LED, but you can grab the project here and we’ll bring up more fun stuff next!
Leave a Reply